

The time comes that a computer is not worth repairing anymore, or it is too costly and buying a new one makes more sense. Before we get started on ways to dispose of your old system, it is worth mentioning that fewer devices can be dismantled in a manner where old parts can be repurposed. Unfortunately, a rapidly growing number of vendors solder components like the memory RAM or storage disk to the logic board as opposed to having them individually snap into the main logic board using a PCI or SATA port. They do this to gain a market monopoly and increased sales of new products, under the excuse of slimmer devices and faster operational speeds. The difference in speeds achieved through soldering as opposed to using SATA and PCI connections are not noticeable by the user, and slimmer devices could still be produced by using a smarter logic board design and components placement within the casing. Buying such devices can cost you a lot of money when it comes to fixing them and we will mention just a few of them, since manufacturers or sellers don’t make this clear to the buyer, causing frustration for both the user as well as the technician when an issue with the device arises.
We find this note fits well into this article since disposing of an old system, usually means buying a new one at the same time. Most Microsoft surfaces, many new Apple Macbook Air and Pro, most Chromebooks and some HP, Dell and Lenovo models come with soldered RAM as well as storage. Just make sure you explicitly ask the seller or vendor if the memory RAM and the storage are soldered, prior to purchasing. If they are then try to steer clear from those devices unless you’re prepared to replace the whole unit, should any issue arise with any of these components. This practice also eliminates the ability to upgrade the device, if necessary, for instance when a user runs out of disk space on their laptop. Should you require advice on purchasing a new system, remember we are here to help you. So now what do you do with the old system and how do you prepare for it?
There are numerous cases where an older system can be repurposed or upgraded. If you’re looking at getting rid of your old system just because it had come to a crawl, know that in most cases there are ways of making that system feel even faster than when it was initially bought, at a fraction of the cost compared to buying a new one. An upgrade to a solid-state drive (check out our FAQ on solid-state drive upgrades and repair costs) coupled with a good internal cleaning and thermal paste replacement is usually all that’s needed to make your system feel like a new one. However, if you decide to get rid of your old computer regardless, then I’m sure your sensitive data is what comes to mind.
Backup Data
First, you will want to somehow save or transfer that data to a new system. So, unless you already have an automated backup in place, let’s look at a few ways out of many in performing a backup task. A transfer to a new system is a process that requires a separate article, as it can get quite complex, so we won’t be tackling that in this article. There are two major ways to backup your data. To the cloud or to a local disk. For cloud backup, you can use iCloud on Apple systems and Microsoft One Drive on a Windows machine. There are other solutions for cloud backup, like Dropbox, Google Backup and Sync, Norton Backup and many others. But iCloud and One Drive are core parts of these two operating systems and are already designed and configured to backup your data. You just need to make sure you login with your account into either of them, turn on backup for desired items and pay for the required storage.
Backup Apple Data
On apple devices, click on the apple icon, select ‘system preferences’, ‘Apple ID’, select iCloud on the left side and you’ll be presented with a few items that iCloud can backup for you on the right-hand side. Make sure to select ‘photos’ and ‘iCloud drive’. This will take care of most of your data, including data stored in the documents folder and on your desktop, as well as your photos and videos. Most users will want to back up their saved passwords and forms, and for this, you want to make sure you select ‘Keychain’ as well.
Backup Windows Data
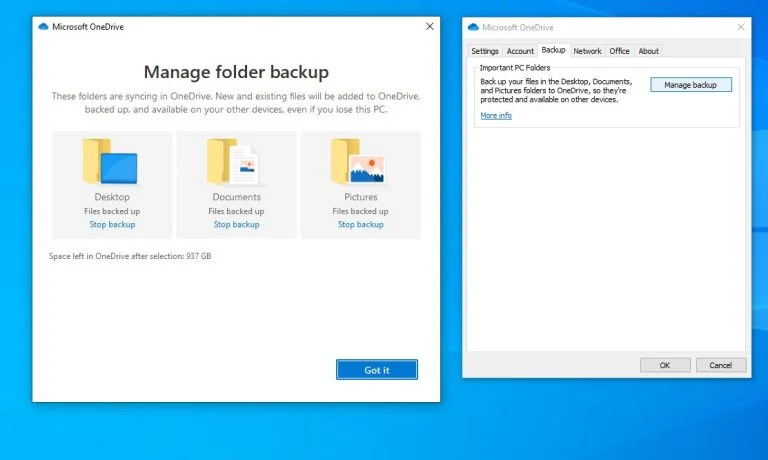
If you use a Windows machine and have One Drive already installed (usually comes pre-installed on Microsoft Windows 10 and newer versions), then you should see its icon located in the lower right corner by the clock (you may have to click on the little arrow pointing up to reveal it). If the icon isn’t there, then it may need to be installed and you can do that by accessing this here. Once installed and the icon had been located, right-click on it, select ‘settings’ and click on the ‘Account’ tab.
If you already have a Microsoft account, you should see it listed in there. Otherwise, click on ‘Add an account’ and follow the prompts to create a new Microsoft account. Once logged in with your account, go to the ‘Backup’ tab and click on ‘Manage backup’. In there you should see your ‘Desktop’, ‘Documents’ and ‘Pictures’ folders. Make sure you select all of them and all your data located in those folders should start backing up to the cloud.
Keep in mind that a free Microsoft account only offers you 5 GB of storage which may not be enough and upgrading to a premium account may be needed. If One Drive hits 90% usage, you will see a ‘Get more storage’ button within One Drive which will take you to the upgrade options. Alternatively, you can sign into www.office.com with your Microsoft account, click on the 9-dot grid icon on the upper left and select One Drive and click on ‘Go Premium’ on the bottom left. From there you can choose either a single-user plan with 1TB of storage or a family plan with up to 6TB.
One Drive will not backup Microsoft Outlook Emails or One Note notes. So, if you have any of these stored in your Documents folder, they will need to be moved, otherwise, it will cause One Drive to halt the documents folder backup. This is a huge drawback and can also create confusion during the setup for the regular user, making it not such a user-friendly tool to use. However, once set up it works flawlessly.
Backup to Local Disk
If you choose to backup to a local disk, you can purchase these for less than CAD 100 at most electronic shops. Our techs also always carry some in case you need one. Both Windows and Apple computers come with integrated backup tools that will perform a full system backup to an external drive.
For Apple, simply plug in the drive into any USB port and Time Machine will automatically detect the new drive. You will be asked if you want to use it as a backup drive, simply say ‘yes’ and you’re literally done. Everything will backup automatically, including your programs.
On Windows systems, the process is a bit more complicated. You have the option to choose between two tools: ‘Backup and Restore (Windows 7)’ and ‘File History’. We won’t go through the differences in this article, just know that both will back up all your documents, desktop items and pictures. Select any of the two and follow the prompts. Mainly go with the defaults and just make sure you select your newly purchased USB disk as the destination for your backup. Both tools are located in ‘Control Panel’ which can be accessed by either searching for it (hit Ctrl+I and in the ‘Find a setting’ box type Control Panel). Once in control panel, type ‘backup’ into the search box (far right upper corner) and both backup tools mentioned above will come up.
Wipe or Remove Drive
Once you’ve saved your data, wipe clean the drive (please see this link for methods of wiping your system), or completely remove the internal storage disk, if not soldered to the main board, keep it and dispose of the rest of the unit.
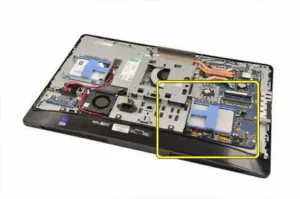
On desktop computers it’s usually an easy task to get to the disk. You pop open the side cover, unplug the cords from it and unscrew it. Laptops can be a bit trickier but not necessarily that hard either unless we’re talking newer models that require the whole palm rest to be removed. The back cover is usually what needs to be removed, or on some laptops, there could be a side bay that can be pulled out after removing a screw nearly located.
All-in-One computers can be the most difficult to access the drive unless they have a dedicated plastic cover on the back, or the disk is placed inside the base of the system as opposed to behind the screen. We have attached a few pictures below that may help you identify the drive on your system. You can also google your make and model drive removal (i.e. ‘hp envy x360 drive removal’), which will most probably produce results with explanatory videos for your specific model. As a final note on preparation, know that realistically, data recovery requires time, knowledge, effort, and money. So, unless someone knows they can get good value out of your data, we doubt they will ever bother trying to do so.


Once the device had been wiped or storage had been removed from the computer, the old system can either be traded in for credit towards your new system, donated or recycled. Check with your device manufacturer to find out if your device is eligible for trade-in and get an estimate. Also, shops like Best Buy may offer you credit for an older device.
If the system is still functional and has a supported operating system installed, then please consider donating. This helps not only our environment but also people in need, like The Salvation Army or Women in Need Society. As for recycling options, there are 4 centers available in Calgary, strategically located throughout the city. Please check the link below to find out the closest location to you https://www.calgary.ca/waste/what-goes-where/computers-and-computer-accessories.html.
If you hired an EezIT technician to transfer data from your old system to the new one or configure that new iPhone for you and don`t feel like driving, then know that EezIT can also recycle your old device for a 20-dollar fee (unless the device is too large or heavy for the technician to load into their own vehicle). Contact us for more information.