Call Us
How to Wipe a Computer

How to Wipe Your Computer Before Disposing
You just bought yourself a new shiny system and are trying to dispose of or maybe donate the old one, but you’re afraid that your sensitive data could be at stake? Unsure how to prepare it for this process? While for many it can be a straightforward process, there are a lot of users out there that are unsure as of where their data is located and are trying to manually delete their data. And it is not only the data explicitly produced and saved by the user that we should be concerned, but a lot of applications nowadays save sensitive information automatically on the disk. Numerous proprietary as well as third party tools like Apple Keychain, Google Chrome, Microsoft Edge and even anti-viruses like Avast could save passwords, login forms and payment info on the disk that could eventually be retrieved by individuals with malicious intentions out there. So, let’s look at how we can properly wipe our devices before donating or disposing of them.
If you’re considering recycling, then the safest method would be to completely remove the internal disk and recycle the rest of the unit. However, if this isn’t possible due to the system configuration, or because you find it difficult to get to the disk, then restoring the device to factory defaults is your better option, if the device is still operational. Do not attempt to delete data manually from folders, as this isn’t going to get rid of all your sensitive stored information, and it is also a longer and more tedious process, compared to a factory reset. We will describe the factory reset process for the 3 major operating systems in use out there.
How to Factory Reset Microsoft Windows (7/8/10/11)
The process is very similar on all versions of Windows, with the only differences being the way to access the factory reset option as well as some wording on specific functions throughout the reset process. We will try to summarize those below.
Windows 7
Windows 7 makes it a bit difficult to get to the factory reset options. Click on the start button and select control panel. Under ‘System and Security’ you will find ‘Backup and Restore’ options. Once you click on that you will see a clickable link named ‘Recover system settings or your computer’. Click on that link and then on ‘Advanced recovery methods’. Once all that is done, you will finally be presented with the ‘Return your computer to the factory condition’ option. Select it and follow the prompts. You could skip the backup if you already saved your data and continue with the system restart. Once restarted, you’ll still have to select the language to install as well as the type of factory reset (with or without user data retention). Obviously, we want to go ahead with the factory reset without user data retention here. The process will finally begin and once completed you will be presented with the user creation and language selection screens. Your data is now removed, and you can forcefully turn off your computer by long pressing the power button. No need to continue with the user creation process.
Windows 8
Windows 8 has two separate graphical interfaces, designed for desktop mode and tablet mode. You can switch between those by licking on the Windows ‘Start’ button. Once in the tablet mode, hover the cursor over to the top right of your screen until the hidden menu pops up. You will notice a gear labeled ‘Settings’. Click on it, go to ‘General’ and scroll down until you see ‘Remove everything and reinstall Windows’. Click on it and follow the prompts. The system will remove all user accounts and data and take you back to the language selection and user creation. Once in there, you can safely shut down your computer.
Windows 10
Windows 10 – Click on ‘Start’ button, select the little gear ‘Settings’, go to ‘Update and Security’, and then click on ‘Get started’ under ‘Reset this PC’, You’ll be asked to ‘Choose an option’. Click on ‘Remove everything’ and the process will start. Follow the prompts and the system will restart and install a new copy of Windows 10. Once you get to the user creation screen, you can forcefully shut down your system by long pressing the power button. At this stage all your personal information had been removed.
Windows 11
Windows 11 – Click on the start button, ‘Settings’, go to ‘System’ and scroll down to ‘Recovery’. Once under the recovery settings, you want to click on ‘Reset this PC’ and select ‘Remove everything’ when presented with the option.
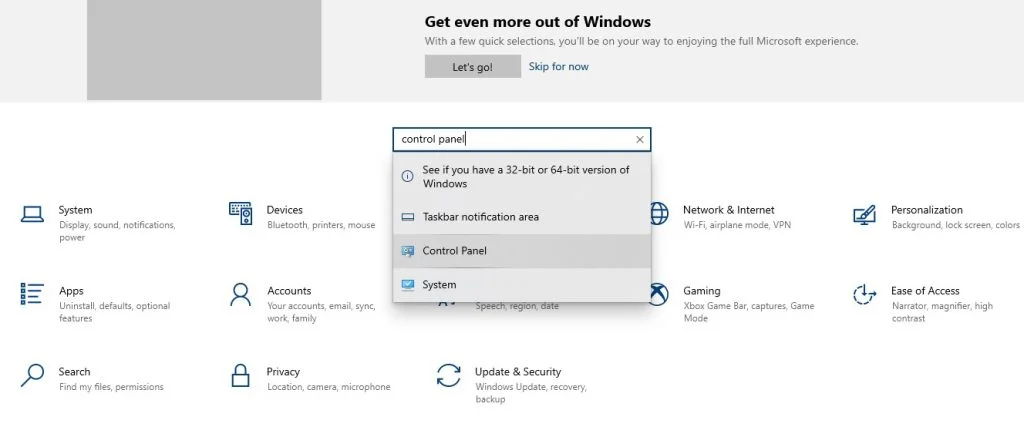
As you can see, Microsoft had made the factory reset easier and more straight forward with each version. On Windows 8, 10 and 11 you also have the ability to simply search for ‘reset’ in order to cut down a few steps in the process. If you get stuck in the process explained above, you still have a solution. That is to create a new profile and remove your old one altogether. The process is different here with each version of Windows, but surely not complicated. Access Control Panel, go to ‘User Accounts’, create a new user with administrative privileges, log out of your current account and login with the newly created one, head over to Control Panel again and delete your old user along with its data. The only downside to this method is that some of your programs will still remain installed on the system, but your data will surely be removed.

How to Factory Reset Apple MacOS
One major difference between MacOS and Windows, is that on most of their systems, Apple gives you access to the so called ‘Disk Utility’, where you can simply wipe the drive without having to reinstall the operating system. This is valid for most systems released up until late 2020, when Apple started producing their own CPU’s. Both Mac computers with an Apple CPU as well as the ones with intel CPU and a T2 security chip use a different procedure to erase the user data. We will describe both procedures below.
Intel CPU
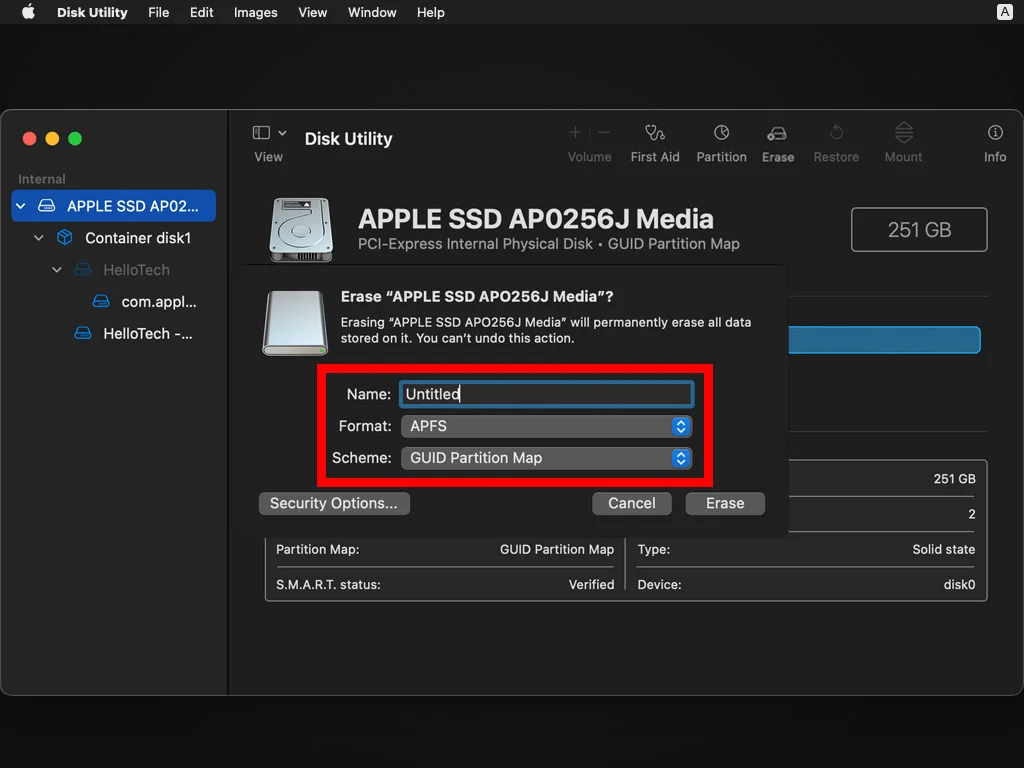
On systems with a non T2 intel CPU, simply power on your system and as soon as you see the Apple logo, hold down ‘command’ and ‘R’ key at the same time until the system restarts. Once it restarts, you can release those keys. It will boot into the recovery environment where you can select the ‘disk utility’. In there, highlight your disk (top container) and hit erase. Once done you can shut down.

Apple CPU
On systems with a T2 chip or an Apple CPU, make sure your system is fully turned off, then hold the power button until ‘Loading startup options’ shows up on your screen then release the power button. Click ‘Continue’ and follow the prompts until you get to the recovery environment. Select ‘Reinstall’ and follow the prompts until you get to the user creation screen. You can power off your system at this stage by long pressing the power button.
How to Factory Reset Chrome OS
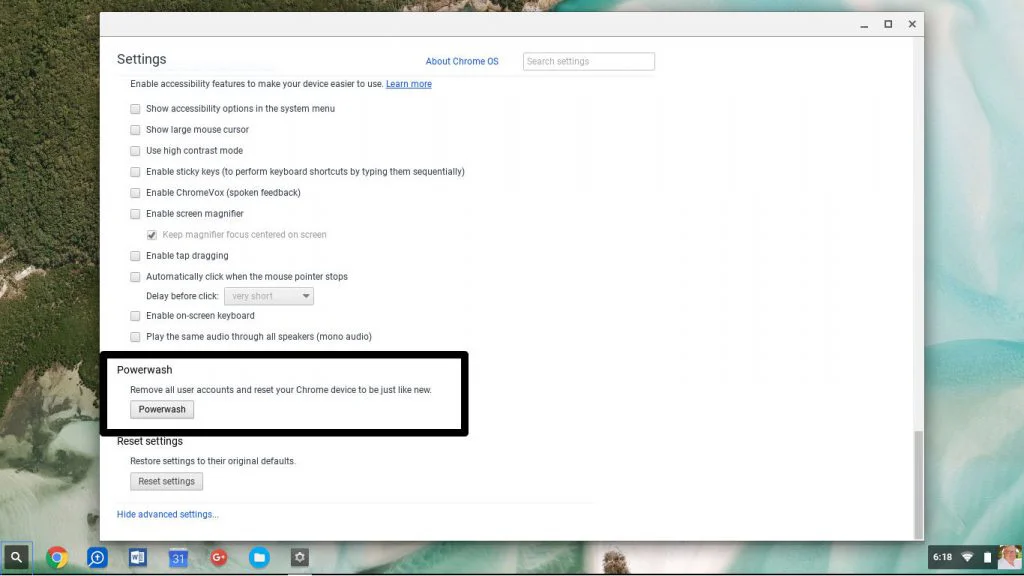
Google sure made it super easy to factory reset your device. Click on the notification center at the bottom right corner, select the little gear icon (Settings), click on Advanced and then go to ‘Reset settings’. Under the ‘Powerwash’ menu click on ‘reset’ and follow the wizard.
In case your Chromebook is freezing and the above method isn’t working, you can also do a ‘hard reset’ on it. Make sure the device is fully powered off. Hold down the ‘refresh’ key and the power button at the same time. This will take you to a screen that shows ‘Chrome OS missing/damaged’. Once there, press Ctrl + D to open the recovery screen. Follow the instructions to reset your Chromebook from the recovery environment.

Trust EezIT with Your Security & Data Wiping
If you still have concerns regarding your data security or need help backing up your data or transferring it to a new system, prior to factory resetting your old device, you can contact us. Our techs can do all that in your house, under your supervision, without taking your computer to a shop.

